Recently, I had to parse user agent (UA) strings in page view events. I started with a Google search like everyone else, but I wasn’t happy with where I landed, so I decided to share my solution in this post.
When you search for "parsing user agent with snowflake," this is the first result in Google. It is a Java UDF with a not-so-straightforward installation process where you download a .jar file etc. Besides I prefer to have a bit more control over my UDFs and ideally defined in dbt so that the lineage is visible and everything is under version control.
In this post, I will explain and share the code for creating a Python UDF that parses UA strings and how to include it in the dbt project.
What is a User Agent?
User Agent is a weird string that looks like this.
Mozilla/5.0 (Macintosh; Intel Mac OS X 10_15_7)
AppleWebKit/537.36 (KHTML, like Gecko) Chrome/119.0.0.0 Safari/537.36
It tells websites about the software initiating the request, often providing details on the operating system and device type.
You can learn your current user agent by visiting here and also see different types of information extracted by different UA parser libraries. This information is highly valuable in the analytics, enabling the analysis of data with respect to device and operating system dimensions. For example, it allows you to evaluate funnel conversions across various browsers and identify any that may be underperforming.
However, extracting this information poses a challenge due to the complexity and unintuitive nature of the user agent string. At first glance, it appears legible, akin to Lorem Ipsum, but if you look closely, you see it is not. This old article from 2010 explains why UA strings are so confusing. It explains that each new browser introduction has compounded the confusion by adding its own unique string while attempting to benefit from pre-existing ones, resulting in an increasingly convoluted accumulation over time.
How to Parse User Agent with Python
Two commonly used Python libraries for this task are:
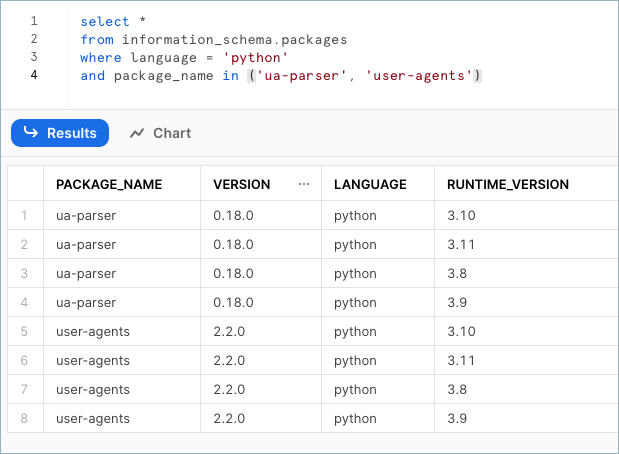
Conveniently, both are accessible in Snowflake. To view available packages in Snowflake, you can use the following query.

For this task, I opted for the user_agents library, as it offers handy flags like is_mobile, is_tablet, is_pc, is_touch_capable, and is_bot. However, it's important to note that it relies on the uap-python library for regex operations, so the outcomes should be similar.
The user_agents library is straightforward in its application.
from user_agents import parse
ua_string = 'Mozilla/5.0 (iPhone; CPU iPhone OS 5_1 like Mac OS X) AppleWebKit/534.46 (KHTML, like Gecko) Version/5.1 Mobile/9B179 Safari/7534.48.3'
user_agent = parse(ua_string)
user_agent.browser.family  # returns 'Mobile Safari'
To incorporate this functionality into a Snowflake UDF, we shall convert it into a function, concurrently extracting additional information from UA.
from user_agents import parse
def f_py_parse_ua(useragent):
    parsed_ua = parse(useragent)
    result_dict = {
        'browser_family': parsed_ua.browser.family,
        'os_family': parsed_ua.os.family,
        'os_version': parsed_ua.os.version_string,
        'device_family': parsed_ua.device.family,
        'device_brand': parsed_ua.device.brand,
        'device_model': parsed_ua.device.model,
        'device_is_mobile': parsed_ua.is_mobile,
        'device_is_tablet': parsed_ua.is_tablet,
        'device_is_touch_capable': parsed_ua.is_touch_capable,
        'device_is_pc': parsed_ua.is_pc,
        'useragent_is_bot': parsed_ua.is_bot,
        }
    return result_dict
This function will accept a user agent string as input and return a dictionary containing the majority of the information available from the library. I exclude things like version numbers for now, but the complete list can be viewed here.
Creating the Snowflake UDF
Next, we will encapsulate this function within a Snowflake UDF
create or replace function f_py_parse_ua (useragent text)
returns variant
language python
runtime_version = '3.10'
packages = ('user-agents')
handler = 'f_py_parse_ua'
as
$$
from user_agents import parse

def f_py_parse_ua(useragent):
    parsed_ua = parse(useragent)
    result_dict = {
        'browser_family': parsed_ua.browser.family,
        'os_family': parsed_ua.os.family,
        'os_version': parsed_ua.os.version_string,
        'device_family': parsed_ua.device.family,
        'device_brand': parsed_ua.device.brand,
        'device_model': parsed_ua.device.model,
        'device_is_mobile': parsed_ua.is_mobile,
        'device_is_tablet': parsed_ua.is_tablet,
        'device_is_touch_capable': parsed_ua.is_touch_capable,
        'device_is_pc': parsed_ua.is_pc,
        'useragent_is_bot': parsed_ua.is_bot,
        }
    return result_dict
    $$
Now, this function can be utilized like any other function in Snowflake. It returns a variant, and by employing the : operator in Snowflake, we can access various objects. An example is provided below.

If you want to understand the upper portion of the code mentioned, here is a simple diagram.
Where Is My Function Stored?
One of the differences between UDFs and built-in functions is their storage and access methods. When we write
create or replace function f_py_parse_ua
We are actually writing:
create or replace function mydatabase.myschema.f_py_parse_ua
In other words, UDFs are identified by fully-qualified names. For instance, in my scenario, the query is executed within the Analytics database and Analytics schema, which is also where the function gets created. We can observe this in the Snowflake UI.

This implies that if you are operating in a different database or schema, it is necessary to invoke the function using its fully qualified name. This detail is crucial when we transition our function to dbt.
Below is an example of how I call the function while working in a different schema

Defining UDF Inside dbt
Here is the method I used to create a macro that generates the UDF. The previous code was darkened to enhance the visibility of differences.

There are two crucial points to note here:
The inclusion of
{{ target.database }}.{{ target.schema }}in the function's name ensures that if the dbt model runs in our development or CI schema, it will be created there as well. This approach allows us to use this UDF in dbt models without needing fully qualified names.Running the macro before the model.
I need this macro only in a single model, so I am adding it in the config file as a pre-hook. This ensures that the macro runs before the model, thereby preparing the UDF in advance.
{{
  config(
    pre_hook = '{{ f_py_parse_ua(useragent) }}'
  )
}}
For scenarios where the macro is needed across multiple models, it's efficient to define a pre-hook in the project.yml file. This method avoids the need for repetitive configuration blocks in each model.
Final Notes
There are two things to keep in mind while using this function:
- Missing User Agent Strings
In specific scenarios, such as events triggered from the backend, a user agent value may be absent. Rather than handling this within the UDF, I am not calling the UDF if user agents do not exist. I didn't test, but I assume this would perform better and also to keep UDF code shorter.
iff(user_agent is not null, f_py_parse_ua(user_agent), null)
- User Agent Data Quality
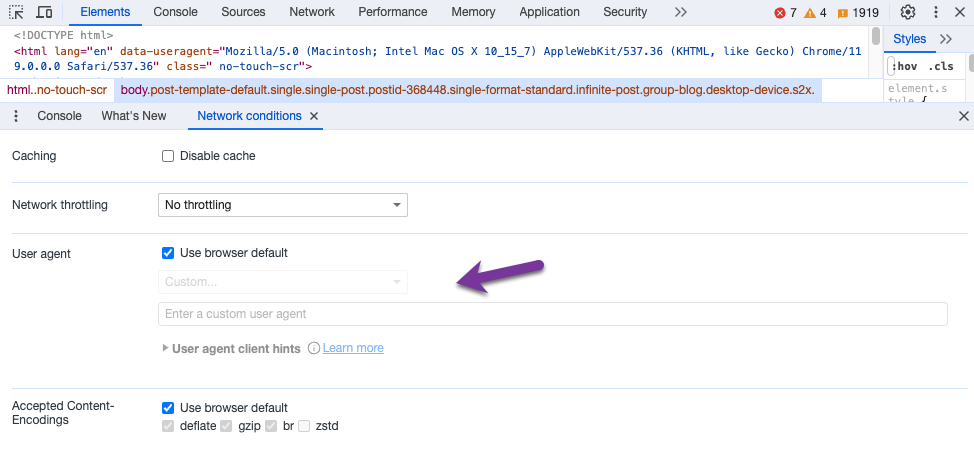
It's possible to set the user agent manually; see the below screenshot from Chrome settings. Therefore, if you encounter unexpected elements in your data, it's important to remember that the user agent you're receiving may not be accurate.


